What you should know about the Subway:
As told by Kirsten Chesney of CustomCare Nutrition.
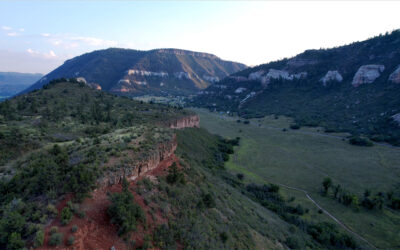
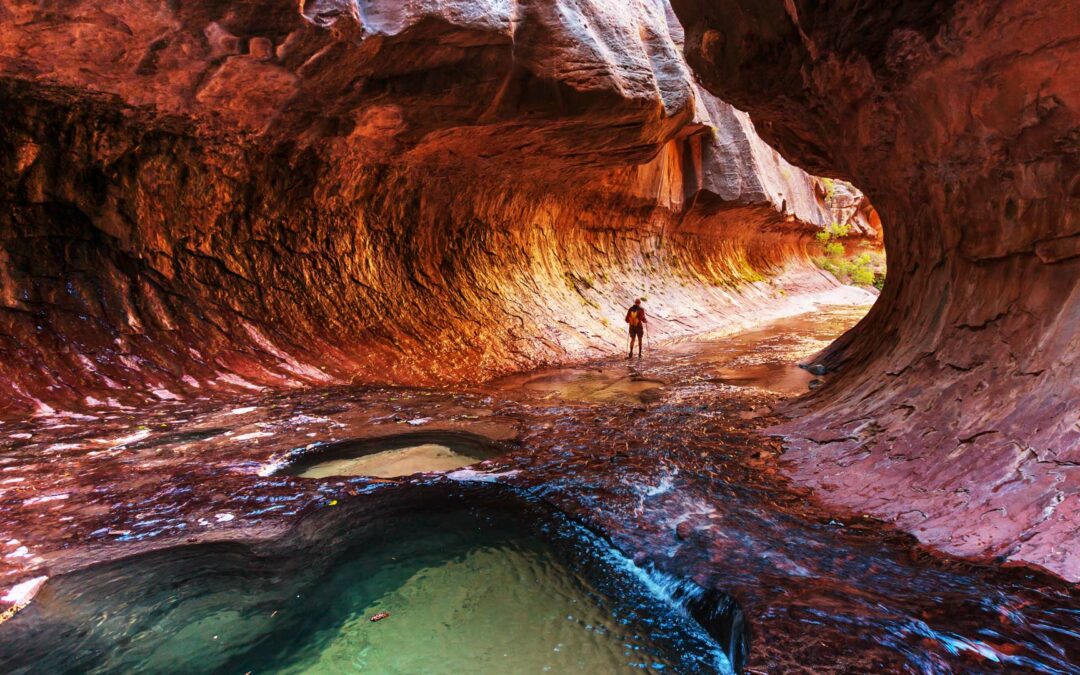
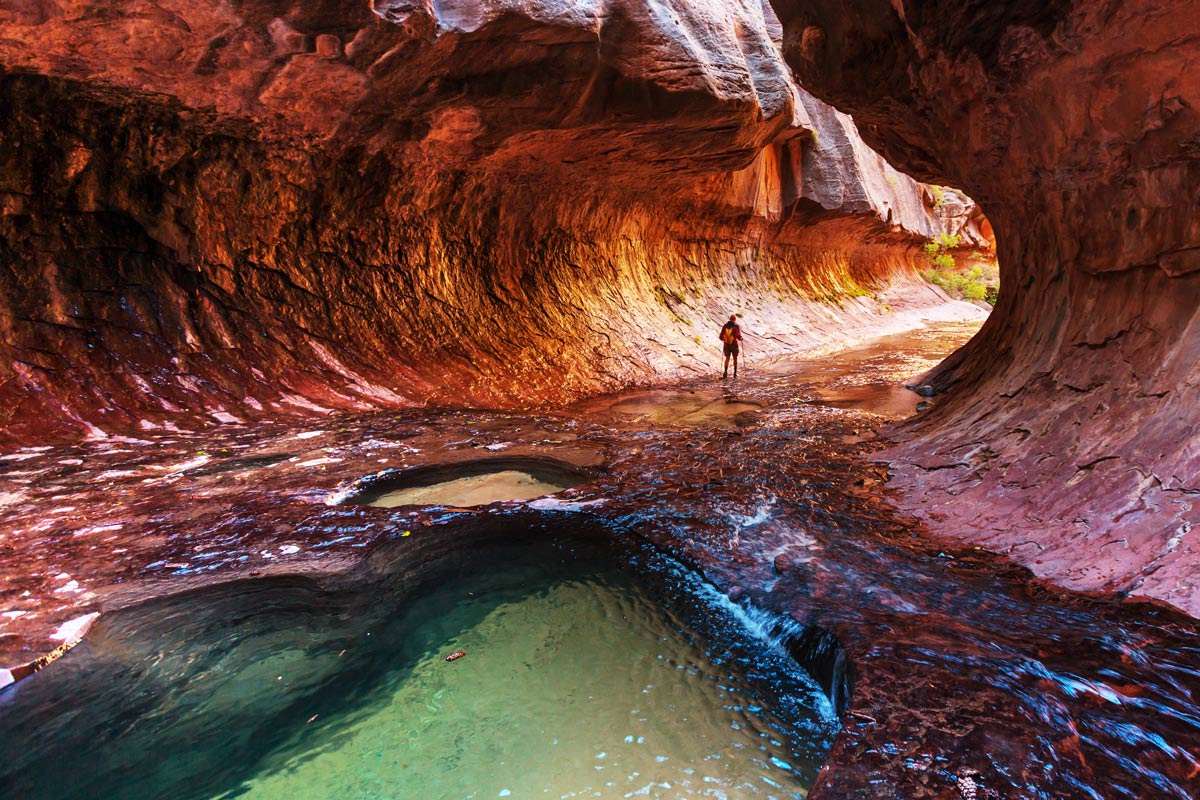
The Subway is a fairly short slot canyon that lies within Zion National Park in Southern Utah outside of Springdale to the west and Kanab to the east. The Subway is about a quarter-mile long and is named because of its smooth, curved walls of rock that create a tube that resembles a train “subway.”
Hikers will need to obtain a permit to hike the Subway, which is obtained from the visitors center at Zion National Park. The longest part of the hike is simply the approach to the Subway, with the last quarter mile that is the Subway proper. But leave your backpacking packs at home, as there is no overnight camping allowed in the Subway, and the hikes can be accomplished in one (albeit long) day.
Before reaching this famous slot canyon, hikers must rock scramble, water wade, and route-find for 3-4 miles (depending on which route you take). Only then will you begin to see the slot canyon form itself around you. Cold, deep pools are scattered along the bottom of the Subway, culminating in a 20-foot tall waterfall and several secluded areas to cool off in before hiking back.
Ways to hike the Subway:
There are two ways to hike the Subway. One route is much more technical than the other. Both routes require a permit and are for day-use only. Hiking to the Subway from any direction will require you to get wet. There are slippery and wet rocks along both routes, as well as a steep section of switchbacks with some loose footing.
From the bottom-up:
The most common and least technical route to the Subway is the “bottom-up” route. This 6.5-mile route is an out-and-back hike that begins and ends at the Left Fork Trailhead off of Kolob Terrace Road. From the parking lot, hikers traverse down the Left Fork Trail following steep switchbacks in order to reach the creek bottom. The descent is very intense in both directions but even more so when you have to climb back up at the end of the day. Most of this route follows North Creek, which involves several creek crossings and route finding, as well as scrambling over or around large boulders. Getting wet is inevitable and the water is cold year-round. Unless you choose to take a cool dip by choice, expect to get most of your legs wet before reaching the Subway.
From the top-down:

The top-down route is the more technical route, covering 9.5 miles from end to end. Hiking top-down requires rappelling skills, 60 feet of rope, and the ability to navigate technical terrain. This route also requires a car shuttle, making it a one-way hike. The top-down route also requires wading through several deep pools of cold water littered with leaf debris. This trail begins at Wildcat Canyon Trailhead and ends at the Left Fork Trailhead, which is where the car shuttle should be parked. The two trailheads are both located on Kolob Terrace Road, 7.5 miles apart. Leaving the Subway via the Left Fork Trail follows the same route as the bottom-up route. North Creek acts as your “trail” for about 4 miles until you reach the steep switchbacks up to the trailhead parking lot and the car shuttle. These switchbacks are intense and you don’t have the convenience of nearby water to cool off.
When to visit the Subway:
The Subway is unique among slot canyons in both Utah and Arizona in that the walls enclose you with circular-carved pools scattered along the slick rock bottom. The Subway is open year-round and is beautiful at any time of year, although it’s most enjoyed from June to October. Any earlier than June and the creek levels will be higher with the winter run-off. Any later than October and it becomes uncomfortably cold with freezing creek water. We have gone in August and found pleasant weather, slight cloud cover, and only came upon about eight other hikers that day.
Things To Consider:
The Subway is a hike that requires some advance planning. Be sure to take the following tips and precautions seriously:
- Begin the hike early, before 9 am, in order to get out before dusk. The hike (using either route) takes about 6-9 hours.
- Avoid hiking the Subway when there is any threat of rain in the forecast
- Some people decide to wear wetsuits to protect against the cold water. This would be a good idea if doing the top-down route, otherwise, a wetsuit would be unnecessary and even lead to overheating if left on too long when dry.
- Be sure you are up for the task of hiking to the Subway, whether you’re rappelling, wading in cold water, scrambling around boulders, walking on slick rock, or finding a faint trail, the two Subway routes are both technical in their own right and should be properly prepared for as well as hiked by experienced hikers only.
- Permits are obtained by visiting the Zion National Park website.
- Permits must then be picked up in the park the day before your hike. Permits can be reserved three months in advance, within 2-7 days before your trip, as well as on a walk-in basis if there are still spots left.
Recommended Hiking Gear For The Subway:
Planning for hiking the Subway not only takes advance planning but also specific gear that is highly recommended, if not downright essential:
- Water. Packing water is essential for the Subway! However, in a pinch, you can filter the creek and canyon pools if necessary. Most people pack enough water for the entire trip: at least two liters per person is a good estimate.
- Wetsuit or drysuit. This is essential for the top-down route of the Subway except during the hottest summer months. Be sure to unzip to the waist or remove the wetsuit altogether when not in the water. Overheating in a wetsuit is a real threat and can lead to serious consequences in the remote desert landscape. Recommend, in the Subway, there is no quick escape!
- Climbing gear. If doing the top-down route, you will need a helmet, over 60 feet of rope, a harness, and a belay device or Gri-Gri. These are essential. There are anchors in the rock, so no need to bring your own anchoring gear or webbing. Check out this guide for a detailed description of how to navigate the rappels.
- Dry bags. This is essential for the top-down route and optional for the bottom-up route.
- Gripping water shoes. Water shoes are not created equal! Be sure to wear shoes with a good grip as well as those that won’t weigh you down while wading. Mountain hiking boots are NOT recommended. Lightweight, breathable, water-friendly material with a good grip is your best bet.
- Lightweight, water-wicking clothing. This should go without saying since much of the hike (no matter the route) involves getting wet to some degree.
- Sun protection. Sunscreen, sunglasses, a wide-brimmed hat, and/or lightweight long sleeves and pants are usually necessary. While there is scattered tree-cover before hitting the Subway, it is not reliable enough to protect you from getting sunburned.
- Hiking poles. This depends on your hiking preferences. Poles are most needed during the switchbacks of the descent and ascent at the beginning and end of the hike, respectively. They may come in handy when wading and stepping on slick boulders, but I find them more cumbersome for my balance. If hiking poles provide stability for you and you are adept at using them, bring them.
- Camera. While not essential, you will regret not bringing a camera on this visually stunning hike.
Wrapping Up:
The Subway, located within Zion National Park is one of the most popular and beautiful backcountry hikes in the park. Because of this, permits are required and are reserved in advance. Both routes to the Subway are technical in different ways and should only be hiked by experienced hikers. Advance planning and having the proper gear will enable hikers to enjoy this unique slot canyon while reducing their risk for harm or injury. The Subway is a great Microadventure that should be on any Southwest adventurer’s to-do list!